MSYS2 FreeType模拟环境搭建

Creative Commons
本作品采用知识共享署名

本文说明在windows下如何利用msys2搭建Freetype的模拟环境。

FreeType是一个用C语言实现的一个字体光栅化库。它可以用来将字符栅格化并映射成位图以及提供其他字体相关业务的支持,在正式移植到嵌入式板子前,我们在Windows上进行模拟运行,以搞清楚如何使用FreeType, 同时也为将来移植后与实际的嵌入式板子做对比。
FreeType的主要任务就是从字体文件中读取字符,并渲染成位图,因此只要能将位图显示处理就可以进行FreeType的验证了。这里在MSYS2中安装SDL2,用SDL2来做显示,使用MSYS2中的GCC编译FreeType及其测试代码,可以在Windows下编译出可执行程序用FreeType读取字库文件,并显示。

环境搭建

所有的代码都放在https://github.com/lgl88911/FT2Test

安装MSYS2和工具

  1. 安装MSYS2:
    参考:MSYS2 LVGL模拟环境搭建,假设我们安装在D:/program/msys2下,那么对应到MSYS2的路径就是/d/program/msys2
  2. 安装依赖工具
    1
    2
    pacman -Syu
    pacman -S git gcc gdb ninja make cmake mingw-w64-i686-SDL2

下载FreeType和测试代码

FT2Test中已经含有freetype-2.11.0的代码

1
git clone https://github.com/lgl88911/FT2Test.git

下载完代码后根据你安装MSYS2的路径修改代码FT2Test/CMakeLists.txt中编译时的依赖路径

1
2
include_directories(/d/program/msys64/mingw32/include/)
link_directories(/d/program/msys64/mingw32/bin)

编译

1
2
3
4
5
6
7
8
9
10
11
12
13
14
15
16
17
18
19
cd ./FT2Test
# 编译FreeType
mkdir ftbuild
cd ./ftbuild
cmake -D CMAKE_INSTALL_PREFIX=$PWD/../INSTALL \
-D CMAKE_DISABLE_FIND_PACKAGE_ZLIB=TRUE \
-D CMAKE_DISABLE_FIND_PACKAGE_BZip2=TRUE \
-D CMAKE_DISABLE_FIND_PACKAGE_PNG=TRUE \
-D CMAKE_DISABLE_FIND_PACKAGE_HarfBuzz=TRUE \
-D CMAKE_DISABLE_FIND_PACKAGE_BrotliDec=TRUE \
../freetype-2.11.0/
ninja
ninja install
# 编译测试程序
cd ../
mkdir build
cd ./build
cmake ../
ninja

注意如果cmake默认不是使用ninja,请执行make而不是ninja进行编译。

测试

默认的测试代码是读取字体并显示,执行build/main.exe,可以看到如下效果
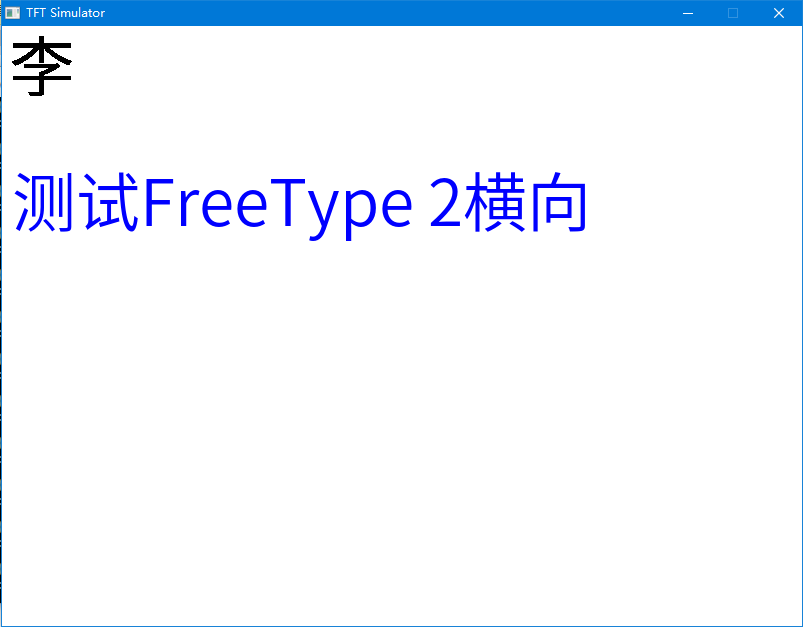
代码说明

代码目录结构如下

1
2
3
4
5
6
7
8
├── CMakeLists.txt
├── LICENSE
├── README.md
├── driver
├── font
├── freetype-2.11.0
├── main.c
└── main.png

  • freetype-2.11.0 是freetype官方的代码,未做任何修改
  • driver是对SDL的封装(参考lvgl修改),目前支持RGB565和RGB888
  • font 字库,只放了思源字库,大家可以根据需要添加
  • CMakeLists.txt cmake文件
  • main.c 测试程序

测试程序说明

1
2
3
4
5
6
7
8
9
10
11
12
13
14
15
16
17
18
19
20
21
22
23
24
25
26
27
28
29
30
31
32
33
34
35
36
37
38
39
40
41
42
43
44
45
46
47
48
49
50
51
52
53
54
55
56
57
58
59
60
61
62
63
64
65
66
67
68
69
70
71
72
73
74
75
76
77
78
79
80
81
82
83
84
85
86
87
88
89
90
91
92
93
94
95
96
97
98
99
100
101
102
103
104
105
106
107
108
109
110
111
112
113
114
115
116
117
118
119
120
121
#include "display.h"
#include <errno.h>
#include <locale.h>
#include <wchar.h>
#include <ft2build.h>
#include FT_FREETYPE_H
#include FT_GLYPH_H

int main(int argc, char **argv)
{
(void)argc; /*Unused*/
(void)argv; /*Unused*/

FT_Library library;
FT_Face face;
//setlocale(LC_ALL,"zh_CN.UTF-8");

uint16_t patten[100*100];
for(int i=0;i<100*100; i++){
patten[i] = 0xF800;
}
//初始化模拟屏,分辨率800*600, rgb565格式
display_init(800, 600, DISPLAY_COLOR_RGB565);
//在(50,50)处画一个20*20的红色矩形
display_write(50, 50, 20, 20, patten);

//初始化FreeType
FT_Error err = FT_Init_FreeType(&library);
printf("Freetype init ret = %d\n", err);
//打开字库
err = FT_New_Face( library,
"../font/SourceHanSansCN-Normal.otf",
0,
&face);
printf("Freetype open font ret = %d %s\n", err, strerror(errno));

//设置要显示字体的大小
err = FT_Set_Pixel_Sizes(face, 64, 0);
printf("Freetype set Pixel ret = %d\n", err);

//加载渲染“李”字
FT_ULong c = L'李';
err = FT_Load_Char(face, c, FT_LOAD_RENDER);
printf("Freetype load char ret = %d c = %x\n", err, c);

//读出来的字默认是8bit灰度
FT_GlyphSlot slot = face->glyph;

uint32_t width = slot->bitmap.width;
uint32_t height = slot->bitmap.rows;
uint8_t *buffer = slot->bitmap.buffer;

uint8_t pixel_format = slot->bitmap.pixel_mode;
printf("Font %d*%d buf %p[%d] pixel %d\n", width, height, buffer, strlen(slot->bitmap.buffer), pixel_format);

for(int j = 0; j<height; j++){
for(int i =0; i<width; i++){
printf("%02x", buffer[i+width*j]);
}
printf("\n");
}

//对8bit灰度图像进行二值化,这将失去细节,会看到有锯齿出现
uint32_t size = width*height;
uint16_t *buffer16 = malloc(size*2);
for(int j=0; j<size; j++){
buffer16[j] = buffer[j]?0x0000:0xFFFF;
}

//将二值化的位图贴到模拟屏上
display_write(10, 10, width, height, buffer16);

free(buffer16);

//循环加载"测试FreeType 2横向"
wchar_t *s = L"测试FreeType 2横向";
int32_t base_x=10, base_y=200;
printf("wcslen %d\n", wcslen(s));
for(int i=0; i<wcslen(s); i++){
//循环加载每一个字符
err = FT_Load_Char(face, s[i], FT_LOAD_RENDER);

FT_GlyphSlot slot = face->glyph;

uint32_t width = slot->bitmap.width;
uint32_t height = slot->bitmap.rows;
uint8_t *buffer = slot->bitmap.buffer;

for(int j = 0; j<height; j++){
for(int i =0; i<width; i++){
printf("%02x", buffer[i+width*j]);
}
printf("\n");
}

//对8bit灰度图进行上色
uint32_t size = width*height;
uint16_t *buffer16 = malloc(size*2);
#define COLORING_MIX(_grey, _f, _b) (((0xFF-_grey)*_b + _grey*_f)/0xFF)
#define COLORING_RGB565(_grey, _FR, _FG, _FB, _BR, _BG, _BB) ((COLORING_MIX(_grey,_FR,_BR)>>3)<<11) | (((COLORING_MIX(_grey,_FG,_BG)>>2)&0x3F)<<5) | ((COLORING_MIX(_grey,_FB,_BB)>>3)&0x1F)
for(int j=0; j<size; j++){
uint16_t grey = buffer[j];
uint16_t RGB565 = COLORING_RGB565(grey, 0, 0, 255, 255, 255, 255);
buffer16[j] = RGB565;
}

printf("Font %d*%d buf %p x %d y %d\n", width, height, buffer, base_x+slot->bitmap_left, base_y-slot->bitmap_top);
//将上色后的位图贴到模拟屏上
display_write(base_x+slot->bitmap_left, base_y-slot->bitmap_top, width, height, buffer16);
base_x += (slot->advance.x >> 6);

free(buffer16);
}

while (1) {
usleep(5 * 1000);
display_update();
}

return 0;
}