本文说明如何使用JTAG调试Zephyr ESP32.
Zephyr内大多数开发板都支持west debug/debugserver,是因为Zephyr集成了相关的配置启动流程,详细可以参考Zephyr调试器配置及原理。但比较遗憾的是目前Zephyr还没有为ESP32集成openocd,本文说明如何手动配置使用Jtag来调试ESP32上的Zephyr。
软硬件说明
调试环境是Windows 10
使用的硬件(Debug Probe)为oocd,oocd使用的ftdi2232做为主芯片,如果用其它openocd支持的硬件都可以。
使用的软件:
- openocd
需要使用espressif修改过后的,在https://github.com/espressif/openocd-esp32/releases中下载,我使用的是openocd-esp32-win32-0.10.0-esp32-20210401.zip - gdb
需要使用espressif提供的toolchain内的gdb,在https://github.com/espressif/crosstool-NG/releases下载,我使用的是xtensa-esp32-elf-gcc8_4_0-esp-2020r3-win64.zip - Vscode
作为gdb的GUI - Zadig
需要使用Zadig为oocd的ftdi2232替换驱动
安装
1. 替换驱动
用USB险连接OOCD和电脑
运行Zadig_X.X.exe
选择 “Options” 菜单中选中 “List All Devices”。
在设备列表中选择 “Dual RS232-HS(Interface 0)”
将原来的 “FTDIBUS (vxxxx)” 驱动需要替换成 “WinUSB (v6xxxxx)”
2.安装工具包
直接解压缩openocd-esp32-win32-0.10.0-esp32-20210401.zip和xtensa-esp32-elf-gcc8_4_0-esp-2020r3-win64.zip即可,我解解压缩后的路径为1
E:\tomato\tools\
Jtag连线
| ESP32 pin | JTAG pin |
|---|---|
| 3V3 | VTRef |
| EN | nTRST |
| IO14 | TMS |
| IO12 | TDI |
| GND | GND |
| IO13 | TCK |
| IO15 | TDO |
配置和调试
1.启动openocd
添加配置
将openocd-esp32\share\openocd\scripts\interface\ftdi\oocd.cfg拷贝一份为esplink.cfg,查看oocd的vid/pid后内容修改如下1
2
3
4
5
6
7
8interface ftdi
#ftdi_device_desc "OOCDLink"
ftdi_vid_pid 0x0403 0x6010
ftdi_layout_init 0x0508 0x0f1b
ftdi_layout_signal nTRST -data 0x0200 -noe 0x0100
ftdi_layout_signal nSRST -data 0x0800 -noe 0x0400
adapter_khz 20000
启动openocd
使用下面命令启动openocd1
.\bin\openocd.exe -f .\share\openocd\scripts\interface\ftdi\esplink.cfg -c 'set ESP32_RTOS none' -f .\share\openocd\scripts\board\esp32-wrover.cfg -s tcl
如果正常启动可以看到下面log1
2
3
4
5
6
7
8
9
10
11
12
13
14
15
16
17
18
19
20
21
22
23Open On-Chip Debugger v0.10.0-esp32-20210401 (2021-04-01-15:46)
Licensed under GNU GPL v2
For bug reports, read
http://openocd.org/doc/doxygen/bugs.html
WARNING!
This file was not tested with real interface, but is assumed to work as this
interface uses the same layout as configs that were verified. Please report your
experience with this file to openocd-devel mailing list, so it could be marked
as working or fixed.
adapter speed: 20000 kHz
none
WARNING: boards/esp32-wrover.cfg is deprecated, and may be removed in a future release.
If your board is ESP32-WROVER-KIT, use board/esp32-wrover-kit-1.8v.cfg instead.
Info : Listening on port 6666 for tcl connections
Info : Listening on port 4444 for telnet connections
Error: libusb_open() failed with LIBUSB_ERROR_NOT_SUPPORTED
Info : ftdi: if you experience problems at higher adapter clocks, try the command "ftdi_tdo_sample_edge falling"
Info : clock speed 20000 kHz
Info : JTAG tap: esp32.cpu0 tap/device found: 0x120034e5 (mfg: 0x272 (Tensilica), part: 0x2003, ver: 0x1)
Info : JTAG tap: esp32.cpu1 tap/device found: 0x120034e5 (mfg: 0x272 (Tensilica), part: 0x2003, ver: 0x1)
Info : esp32.cpu0: Target halted, PC=0x400D29A0, debug_reason=00000000
Info : Listening on port 3333 for gdb connections
2. 调试
WSL下用gdb连接调试
该方式是存使用命令行进行调试,在使用VSCodec调试前可以使用该方法快速确认openocd是否可以连通1
~/.espressif/tools/xtensa-esp32-elf/esp-2020r3-8.4.0/xtensa-esp32-elf/bin/xtensa-esp32-elf-gdb build/zephyr/zephyr.elf
进入gdb后执行target remote 127.0.0.1:3333连接openocd。
这里执行WSL下的xtensa-esp32-elf-gdb时可能会提示找不到libpython2.7,执行下面命令安装即可1
sudo apt-get install libpython2.7
VSCode调试
该方式是使用GUI进行调试,需要安装native-debug插件并先进行一些配置才能使用
- 在VSCode的插件管理器中搜索native-debug并安装
- 选择File->Open Folder选择要调试代码的文件夹打开
选择Debug->Open Configurations,在提示框中选择gdb后会自动打开一个lauch.json文件,修改内容如下
1
2
3
4
5
6
7
8
9
10
11
12
13
14
15
16
17{
"name": "zephyr",
"type": "gdb",
"request": "launch",
"target": "E:/tomato/build/zephyr/zephyr.elf",
"cwd": "${workspaceRoot}",
"valuesFormatting": "parseText",
"autorun": [
"target remote 127.0.0.1:3333",
"set substitute-path /mnt/e/tomato e:/tomato",
"set remote hardware-watchpoint-limit 2",
"mon reset halt",
"flushregs",
"thb __start",
],
"gdbpath": "E:/tomato/tools/xtensa-esp32-elf/bin/xtensa-esp32-elf-gdb"
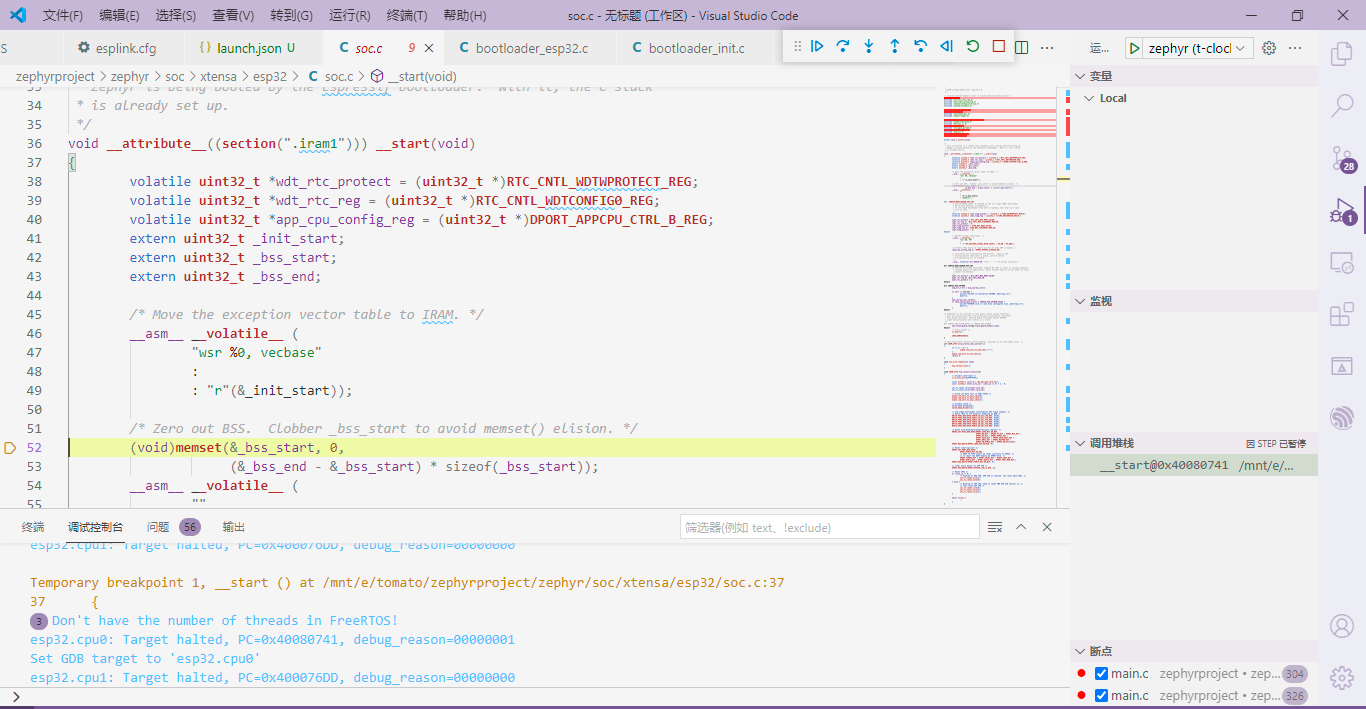
}选择Debug->Start Debuging或者按F5就会启动调试,看到下面界面

几点说明:
OpenOCD的启动
Zephyr的ESP32文档中描述启动Openocd要使用'set ESP32_ONLYCPU 1',原因是
The ESP32_ONLYCPU setting is critical: without it OpenOCD will present only the “APP_CPU” via the gdbserver, and not the “PRO_CPU” on which Zephyr is running. It’s currently unexplored as to whether the CPU can be switched at runtime or if breakpoints can be set for either/both.
但实际测试好像刚刚相反,去掉这个设置才能同时看到APP_CPU和PRO_CPU.
native配置说明
配置项的说明可以参考/pyocd搭配vscode-native-debug插件调试zephyr一文。这里主要说明一下autorun内的gdb命令:target remote 127.0.0.1:3333 连接openocd的gdb server。set substitute-path /mnt/e/tomato e:/tomato 代码编译是在WSL下进行的使用的是linux路径,调试是用的windows的gdb,为了找到源文件需要做路径转换。
剩余的4条命令可以看文末参考,里面有详细说明,这里只说明断点设置,从Zephyr ESP32启动流程一文中我们知道对于ESP32来说zephyr中最先执行的就是__start因此我们使用将断点设置到这里,这也就是前文说分析启动流程对调试有帮助的原因。
问题和解决
1.不能连接Jtag
现象:启动Openocd提示, 不能正常连接Jtag1
2
3
4
5
6
7Error: libusb_open() failed with LIBUSB_ERROR_NOT_SUPPORTED
Info : ftdi: if you experience problems at higher adapter clocks, try the command "ftdi_tdo_sample_edge falling"
...
Error: double-check your JTAG setup (interface, speed, ...)
Error: Trying to use configured scan chain anyway...
Warn : AUTO auto0.tap - use "jtag newtap auto0 tap -irlen 2 -expected-id 0x00000000"
Error: auto0.tap: IR capture error; saw 0x0000 not 0x0001
处理方法:确认TDI是否和IO12正常连接,我眼花连到IO21出了上面的问题,找了好久原因。
2.连接Jtag后无法正常烧写程序
现象1:用west flash烧写程序时提示1
2
3
4Warning: Could not auto-detect Flash size (FlashID=0xffffff, SizeID=0xff), defaulting to 4MB
Flash params set to 0x0220
A fatal error occurred: Timed out waiting for packet content
处理方法:将TDI和IO12断开
现象2:用west flash烧写程序时长时间连接不成功提示1
Failed to connect to ESP32: Timed out waiting for packet header
处理方法:将nTRST和EN断开
参考
https://docs.zephyrproject.org/latest/boards/xtensa/esp32/doc/index.html
https://docs.espressif.com/projects/esp-idf/zh_CN/latest/esp32/api-guides/jtag-debugging/tips-and-quirks.html#jtag-debugging-tip-debugger-startup-commands
